Tag: linux

  • Using the SonicWall Connect Tunnel with Firefox on a Chromebook

    Yes, you read that correctly. Firefox on a Chromebook! Without tricks.

    Or at least, not many tricks.

    Why?

    When you want to use the SonicWall Connect Tunnel software (from the SMA 1000 Series) on your Chromebook the suggested SonicWall Mobile Connect app does not work properly. I don’t know why, but there is a solution.

    The solution

    In one sentence: install the (Java based) SonicWall VPN Connect Tunnel software and install Firefox in the Linux VM on your Chromebook.

    The result: Chrome and Firefox side by side with the Sonicwall Connect Tunnel.

    How?

    Here we go.

    Enable Linux virtual machine on your Chromebook: i.e. set up developer mode.

    This used to be a whole thing, now it is very easy.

    Just flip a switch in the settings. No joke.

    Dutch: but go to Settings and Developers

    Great! You now have an (almost) full-blown Linux OS at your disposal!

    You can do things.

    Next, start the Terminal app and select Penguin (this the default name on a Chromebook for your Linux VM).

    Select
    Click it

    You get a prompt.

    Prompt

    Next, download the SonicWall Connect Tunnel from within your terminal with wget.

    Get the correct URL from here.

    wget https://software.sonicwall.com/CT-NX-VPNClients/CT-12.4.2/ConnectTunnel_Linux64-12.42.00664.tar

    It looks like this

    Unpack the downloaded file:

    tar -xvf ConnectTunnel_Linux64-12.42.00664.tar

    Install it:

    sudo ./install.sh

    Next, install the Java Runtime, you need this for the SonicWall VPN:

    sudo apt-get install default-jre

    Install a webbrowser:

    sudo apt-get install firefox-esr

    Now you can start the Sonicwall VPN:

    startctui

    You are presented with the familiar SonicWall tool. And after connecting to your VPN, you can start your browser from your terminal (start a new terminal tab, the other one has startctui running):

    firefox-esr

    Or just use the Chromebook global search to find and start the Firefox browser.

    Being a GUI application installed in your container, somehow Chrome recognizes this and gives you the option to start it from the Chromebook menu and/or pin it to your dock.

    This does not work with the SonicWall GUI.

    And that’s it.

    The strange part is that Firefox is able to use the VPN connection, your regular Chrome browser won’t. I figured that his is probably for the same reason that the default SonicWall app does not work (maybe it does work with Firefox, something for you to try out!).

  • Compact WSL partition and reclaim storage space

    Start PowerShell

    wsl --shutdown

    Find where your WSL vhdx file is located. Usually under:

    C:\Users\yourname\AppData\Local\Package\Linuxdistroflavour\LocalState\ext4.vhdx

    Start diskpart (from PowerShell or CMD): diskpart.exe

    Run:

    select vdisk file="C:\Users\Jan van den Berg\AppData\Local\Packages\TheDebianProject.DebianGNULinux_76v4gfsz19hv4\LocalState\ext4.vhdx"

    and next:

    compact vdisk

  • I don’t understand terminals, shells and SSH

    Confession time: I don’t fully understand how terminals, shells and SSH really work (and my guess is you don’t either). And I don’t mean the cryptography behind SSH. I mean how SSH and the terminal — and the shell for that matter — interact with one another.

    I recently realized that even though I’ve been daily remotely logging into Linux systems for all of my adult life (and type in the shell and Vim) I didn’t really grasp how these things actually work.

    Of course I conceptually know what a (virtual) terminal is (entering input and displaying output) and what the shell is for (the interpreter). And SSH is the remote login protocol, right? (Or is SSH a pseudoterminal inside another pseudoterminal, who’s to say)?

    The distinction between these three elements is a bit fuzzy and I do not have a clear concept of it in my head. The test being: could I draw it on a whiteboard? Or: could I explain it to a novice? The answer is probably: not really.

    So I went on a bender and found these four (well-known) links that explain things like tty, rawmode, ptms/ptx, pseudoterminals and more.

    This post functions as a bookmark placeholder. I will add more links when I find them.

    There’s lots of information here if you’re interested. And of course: you mostly don’t actually need to know any of these things to do your work — we are all forever standing on the shoulders of giants. But I *want* to understand these things. And I think I understand them a little bit better now. Maybe you will as well.

  • Using Windows OpenSSH Agent with Windows Terminal and Cygwin

    I am back to running Windows Terminal + Cygwin, after a stint with MobaXterm. I blogged about it before.

    Why:

    • Windows Terminal is pretty good: it doesn’t get in your way, and it’s fast (*very* important).
    • Cygwin gives me access to grep, awk, vim and much more.

    In the end MobaXterm just had too many quirks. Specifically when changing screens — docking / undocking which I do a lot during the day. However, one thing I really did like about MobaXterm was the integrated SSH agent (MobAgent).

    That part worked really well.

    That was what kept me from switching back to Windows Terminal and Cygwin.

    But I recently found out that Windows 10 comes with its own SSH Agent (?!). That was news to me.

    So I now use the Windows SSH Agent. So, not Pageant or OmniSSHAgent or any other Windows SSH Agent or keychain, because these all have issues (I tried them).
    Also running eval $(ssh-agent) for every new terminal window (that zombies when you close your shell) kind of defeats the purpose of having an SSH agent.

    How?

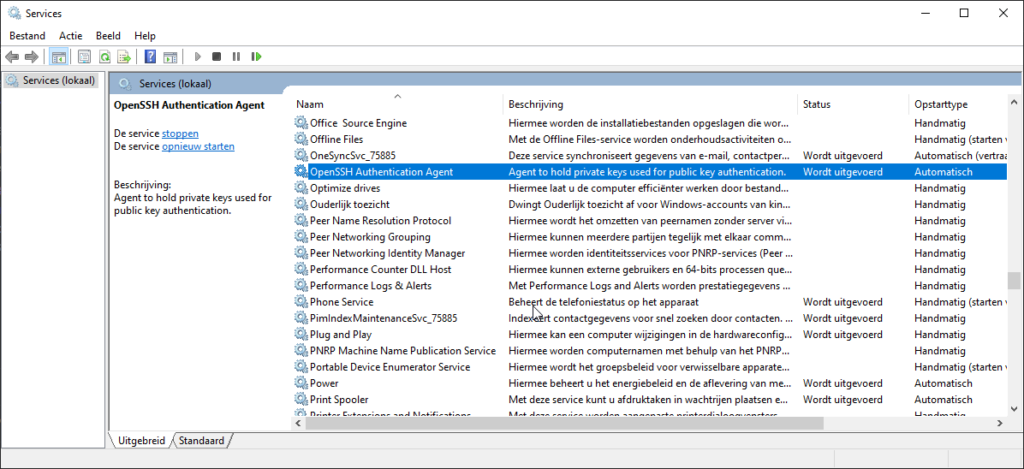
    First you need to tell Windows to start the OpenSSH Authentication Agent on boot:

    PowerShell can tell you if the agent is running:

    Looks good!

    And now comes the tricky part. Using Cygwin AND using this ssh-agent i.e. adding and retrieving keys to and from the agent.

    Of course you can add keys with ssh-add or by adding the -A parameter to the ssh command.

    PS C:\Users\Jan van den Berg> ssh-add.exe .ssh\id_rsa

    But you need to understand this next bit first.

    When invoking ssh in Cygwin you invoke a different ssh client than the default Windows SSH client. One is the Cygwin ssh client, and the other one is the one that comes with Windows. I blogged about this before.

    Spot the differences in this next image:

    These are two different SSH clients

    And here is the secret (that took me way too long to figure out, thanks ssh -v)

    Only when invoking the latter (ssh.exe) you get access to the Windows OpenSSH Agent!

    This is especially tricky when you want to specify identity files. Make sure you use the right paths, the Windows SSH client will look in other default paths. Something to consider.

    My workflow now is as follows: I have defined a couple of bash aliases in my Cygwin .bashrc file so when I fire up Windows Terminal (fast) I can jump to a specified SSH host with one or two keypresses — all the while using the correct SSH keypair with a passphrase I only have to enter once per Windows boot! (edit: I assumed it would be per boot, but it seems the Windows SSH agent holds the keys forever, that may actually be too much of a good thing….).

    alias ms='/cygdrive/c/Windows/System32/OpenSSH/ssh.exe -A -i 'C:\Users\Jan van den Berg\.ssh\mm-id_rsa' jan@myserver'
  • Windows Terminal + Cygwin

    [UPDATE July 2022: I switched to using MobaXterm which does the job just fine. I don’t like that it is not free/open but I do like that it comes with an integrated SSH agent, which makes life a lot easier]

    I had been a happy WSL1 user for many years, but after switching laptops I more or less had to upgrade to WSL2. Which is the same thing but not really.

    The thing is, WSL2 startup times are annoyingly slow. And I hate slow. Computers have to be fast and snappy.

    So after poking around — many blogs and Github issues — I decided to ditch WSL and move on.

    So I entered the world of terminal emulators and unixy environments, which can be overwhelmingly confusing at times.

    Windows Terminal

    First I settled on Windows Terminal as a terminal emulator. I already starting using this for WSL (which comes default with MinTTY).

    MinTTY is used *a lot* and many tools are actually MinTTY under the hood. Cygwin also comes with MinTTY by default. And MinTTY is pretty good, however: it has no tabs.

    Windows Terminal is the only terminal emulator I found (on Windows) that does tabs decently! The only other ones I found were ConEmu, but it feels a bit less snappy, and cmder (which uses ConEmu so it has the same problem).

    Once you have tabs, you don’t want to go back.

    Windows Terminal is a native Windows binary, so that might explain that snappy feel.

    So Windows Terminal it is.

    But now, how do I get that Linux feel on Windows! WSL1 was pretty perfect, an almost native feeling Linux environment.

    There are many alternatives and emulation option (like running VirtualBox or MinGW et al.) but why not go with good, old, trusty Cygwin solution. Their tagline is enticing:

    Get that Linux feeling – on Windows

    That sounds good!

    Cygwin

    I knew Cygwin from way back, and I noticed it still hasn’t changed its logical, but somewhat archaic installation procedure.

    Cygwin installs itself in a folder with a bunch of recompiled for Windows GPL tools, to create a hierarchy that LOOKS and FEELS like a Linux environment.

    Fine, whatever.

    As long as I can use, grep, rsync, ssh, wget, vim and awk, right?

    And I can. Cygwin makes a whole lot of recompiled GNU tools available for Windows — including the above.

    However a basic Cygwin installation is pretty minimalistic, so I had to run the installer a few times to get all the software packages I needed (like ssh, vim and wget they are not installed by default). This makes Cygwin a bit different: you can — and usually have to — run the installer a few times to get everything you need.

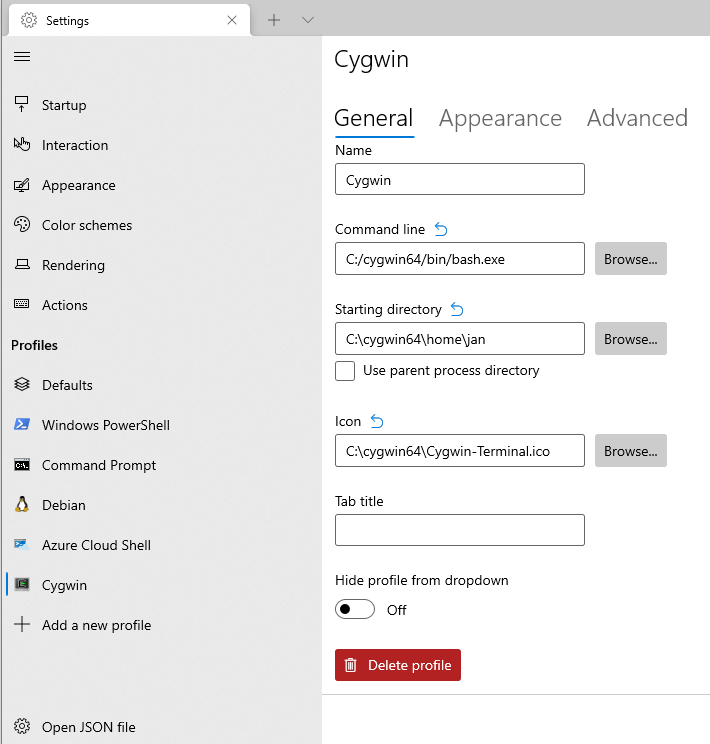
    Next I added Cygwin to my Windows Terminal and made it the default. And with ‘added’ I mean I made a Windows Terminal profile that starts the bash.exe program that comes with Cygwin and drops me in the Cygin homedir (which is actually a Windows path).

    A terminal emulator in itself does nothing except handle input / output, and running a shell program like bash enables you to interact with your files (or OS) by sending input signals trough a terminal emulator and processing its output signals.

    Cygwin comes with MinTTY by default (of course): if this had (decent) tabs, I’d probably chuck Windows Terminal.

    In Windows Terminal you can click a profile together, which edits a JSON file, but you can also directly edit the JSON if you know what you are doing.

    brave_2022-01-05_13-21-05.png (710×744)
    Windows Terminal: setting Cygwin

    Improvements

    I think I really like that Cygwin keeps everything in one folder and doesn’t mess too much with my Windows installation, or path settings and all that. I think (?) it’s just a folder (pretty portable).

    Two things though.

    Prompt

    Cygwin needs a better looking prompt. Well here you go:

    export PS1="\u@\h:[\e[1;32m]\w \e[m \D{%T}# "

    Try it, you’ll like it. Colors, path, username, time, it has everthing! Put it in your .bash_rc

    SSH

    I could not figure out why my SSH keys weren’t working when connecting to my server. But when I dropped into verbose mode (ssh -vv) I saw ssh wanted to use keys from C:\Users\Jan van den Berg\.ssh instead of the Cygwin homedir /home/jan/.ssh

    I spent waaaaay too much timing thinking why Cygwin would do this, until I noticed the SSH binary I invoked was the default Windows 10 OpenSSH client, which will default to looking in the Windows homedir for ssh keys instead of the Cygwin homedir.

    So you have to specifically invoke /bin/ssh (or you can remove the Windows OpenSSH client, or change symlinks, or change paths, whatever works for you).

    WindowsTerminal_2022-01-05_19-21-35.png (1011×149)
    Spot the difference, on of these is not like the other.

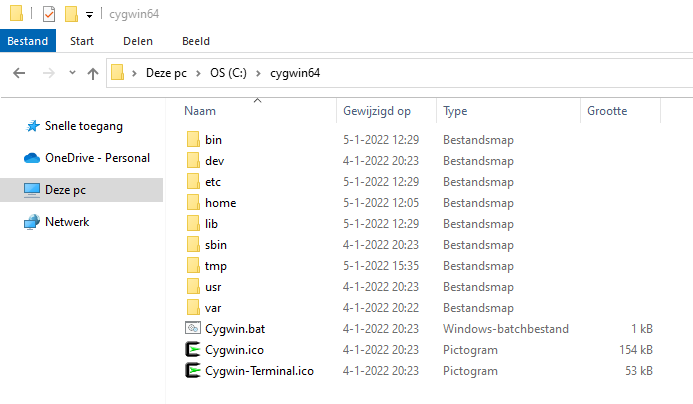
    The lesson is: be aware that Cygwin is just a bunch of Windows executables, and it will therefore also look in your Windows path.

    explorer_2022-01-05_16-32-42.png (693×404)
    Just files

    Conclusion

    I think I am pretty happy with this setup, mainly because it starts almost instantly! And that was the whole point.

  • Bypassing Hetzner mail port block (port 25/465)

    I recently switched my VPS from Linode to Hetzner. I got more CPU, RAM and storage for less money. Pretty good right?

    However it wasn’t after I migrated that I found out Hetzner blocks all outgoing port 25 and 465 traffic.

    At least; for the first month for new customers.

    This means my new server cannot talk SMTP with the rest of the world i.e. my server cannot send mail!

    (Note: you can however connect to mailservers that listen on port 587).

    I can see why they would do this, however this is less than ideal if you have a production server with a couple of webshops.

    So, now what?

    My server cannot send mail itself but it can also not connect to a smarthost (a different server that does the mail sending), because smarthosts are typically also on port 25/465.

    I do however have a Raspberry Pi in my home network. What if I run a mail server on a different port there, say 2500?

    So, my VPS can relay the mail there. But I don’t want my Pi to be connected to the internet and send mail. So then what? Why not relay from the Pi to an actual smarthost. Which smarthost? Well my ISP offers authenticated SMTP so I can relay mail from my VPS to my Pi and from my Pi to my ISP. And my ISP can send the mail to anywhere.

    This could work.

    The setup

    This is what it looks like.

    There are two mail server configurations in place. I use exim4 on Debian and you can easily run dpkg-reconfigure exim4-config to (re)create a valid Exim config.

    This command will (re)create a file which holds all specific Exim configuration: /etc/exim4/update-exim4.conf.conf

    It’s a small and easy to understand file. Here follow the complete contents of both files, for reference.

    Hetzner VPS exim4 config

    dc_eximconfig_configtype='satellite'
    dc_other_hostnames='topicalcovers.com;brug.info;piks.nl;j11g.com;posthistorie.nl;server.j11g.com'
    dc_local_interfaces='157.90.24.20'
    dc_readhost=''
    dc_relay_domains=''
    dc_minimaldns='false'
    dc_relay_nets=''
    dc_smarthost='212.84.154.148::2500'
    CFILEMODE='644'
    dc_use_split_config='false'
    dc_hide_mailname='false'
    dc_mailname_in_oh='true'
    dc_localdelivery='mail_spool'

    Note: use a double semi-colon to specify a mailserver that listens on a different port.

    Raspberry Pi exim4 config

    dc_eximconfig_configtype='smarthost'
    dc_other_hostnames=''
    dc_local_interfaces='192.168.178.135'
    dc_readhost=''
    dc_relay_domains='posthistorie.nl,topicalcovers.com,piks.nl,j11g.com,server.j11g.com,willempasterkamp.nl'
    dc_minimaldns='false'
    dc_relay_nets='157.90.24.20'
    dc_smarthost='mail.solcon.nl'
    CFILEMODE='644'
    dc_use_split_config='false'
    dc_hide_mailname='false'
    dc_mailname_in_oh='true'
    dc_localdelivery='mail_spool'

    For this to work you also need to edit your file /etc/exim4/passwd.client with the a valid mailboxname and password:

    mail.solcon.nl:authorizedmailboxname:pa$$word

    Or use an asterisk ( * ) to use the credentials for every mailserver. If you (only) use a smarthost, this is fine.

    SPF records

    The above configs are what you need to do on your Hetzner VPS and your Pi. Next, you need to change your SPF records.

    The SPF records tell the receiving mailserver that the sending mailserver is allowed to relay/send mail for a specific domain.

    As you can tell I have multiple domains, so that means editting multiple SPF records. Here is what one SPF records looks like. This is public information, anyone can (and should) look up your domain SPF records.

    This is the raw SPF record:

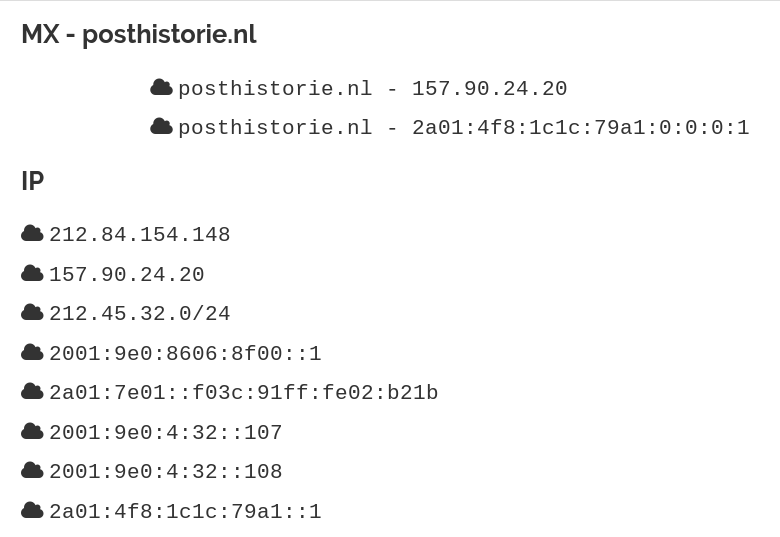
    v=spf1 mx ip4:212.84.154.148 ip4:157.90.24.20 ip4:212.45.32.0/24 ip6:2001:9e0:8606:8f00::1 ip6:2a01:7e01::f03c:91ff:fe02:b21b ip6:2001:9e0:4:32::107 ip6:2001:9e0:4:32::108 ip6:2a01:4f8:1c1c:79a1::1 ~all

    You can see it’s a mix of IPv4 and IPv6. For readability, the next image is what it actually says.

    MX – All mail for this domain should be send TO a specific IPv4 or IPv6 address.

    Next: you can see which IPv4 and IPv6 addresses are allowed to send mail for this domain. So where mail is accepted FROM.

    So if my VPS wants to send a mail to @gmail.com it will relay the mail to my Pi, which will happily accept the mail, and will relay it to my ISP mail server, and my ISP mail server will try to deliver the mail to Google Mail. Google Mail however will CHECK if the IP address for my ISP mail server MATCHES the SPF records. If Google finds that the IP addresses from my ISP mail servers are not in the SPF records, it will not accept the mail. But if they match, Google Mail will accept the mail.

  • Migrating a LAMP VPS

    I recently switched my LAMP virtual server to a different VPS provider.

    The LAMP server that is serving you this site. So the migration worked!

    Here are the steps, for future reference. Mostly for myself, but maybe you — someone who came here from Google — can use this too. This should work on any small to medium sized VPS.

    Let’s go!

    Lower your DNS records TTL value

    When you switch to a new VPS, you will get a new IP address (probably two: IPv4 an IPv6). And you probably have one or more domain names, that point to that IP. Those records will have to be changed for a successful migration.

    You need to prepare your DNS TTL.

    To do this, set your DNS TTL to one minute (60 seconds), so when you make the switch, your DNS change will be propagated swiftly. Don’t change this right before the switch of course, it will have no effect. Change it at least 48 hours in advance of the change.

    Set up a new VPS with the same OS

    Don’t go from Ubuntu to Debian or vice-versa if you don’t want any headaches. Go from Debian 10 to Debian 10. Or CentOS 8 to CentOS 8. Or what have you.

    This blog focusses on Debian.

    Install all your packages: Apache, MySQL, PHP and what else you need.

    My advice is to use the package configs! Do not try to to copy over package settings from the old server, except where it matters, more on that later.

    This starts you fresh.

    PHP

    Just install PHP from package. Maybe if you have specific php.ini settings change those, otherwise you should be good to go. Most Debian packages are fine out of the box for a VPS.

    I needed the following extra packages:

    apt-get install php7.4-gd php7.4-imagick php7.4-mbstring php7.4-xml php7.4-bz2 php7.4-zip php7.4-curl php7.4-mysql php-twig

    MySQL/MariaDB

    apt-get install mariadb-server

    Run this after a fresh MariaDB installation

    /usr/bin/mysql_secure_installation

    Now you have a clean (and somewhat secure) MariaDB server, with no databases (except the default ones).

    On the old server you want to use the following tool to export MySQL/MariaDB user accounts and their privileges. Later we will will export and import all databases. But that is just data. This tool is the preferred way to deal with the export and import of user accounts:

    pt-show-grants

    This generates a bunch of GRANT queries that you can run on the new server. Run this on the new server (or clean them up first if you need to, delete old users etc.). So that after you import the databases, all the database user rights will be correct.

    Set this on the old server, it helps for processing later.

    SET GLOBAL innodb_fast_shutdown=0

    Rsync all the things

    This is probably the most time consuming step, my advice is to do it once to get a full initial backup, and once more right before the change to get the latest changes: which will be way faster. Rsync is the perfect tool for this, because it is smart enough to only sync changes.

    Make sure the new server can connect via SSH (as root) to the old server: my advice is to deploy the SSH keys (you should know how this works, otherwise you have no business reading this post ;)).

    With that in place you can run rsync without password prompts.

    My rsync script looks like this, your files and locations may be different of course.

    Some folders I rsync to where I want them (e.g. /var/log/apache) others I put them in a backup dir for reference and manual copying later (e.g. the complete /etc dir).

    #Sync all necessary files.
    #Homedir skip .ssh directories!
    rsync -havzP --delete --stats --exclude '.ssh' root@139.162.180.162:/home/jan/ /home/jan/
    #root home
    rsync -havzP --delete --stats --exclude '.ssh' root@139.162.180.162:/root/ /root/
    #Critical files
    rsync -havzP --delete --stats root@139.162.180.162:/var/lib/prosody/ /home/backup/server.piks.nl/var/lib/prosody
    rsync -havzP --delete --stats root@139.162.180.162:/var/spool/cron/crontabs /home/backup/server.piks.nl/var/spool/cron/crontabs 
    #I want my webserver logs
    rsync -havzP --delete --stats root@139.162.180.162:/var/log/apache2/ /var/log/apache2/
    #Here are most of your config files. Put them somewhere safe for reference
    rsync -havzP --delete --stats root@139.162.180.162:/etc/ /home/backup/server.piks.nl/etc/
    #Most important folder
    rsync -havzP --delete --stats root@139.162.180.162:/var/www/ /var/www/

    You run this ON the new server and PULL in all relevant data FROM the old server.

    The trick is to put this script NOT in /home/jan or /root or any of the other folders that you rsync because they get be overwritten by rsync.

    Another trick is to NOT copy your .ssh directories. It is bad practice and can really mess things up, since rsync uses SSH to connect. Keep the old and new SSH accounts separated! Use different password and/or SSH keys for the old and the new server.

    Apache

    If you installed from package, Apache should be up and running already.

    Extra modules I had to enable:

    a2enmod rewrite socache_shmcb ssl authz_groupfile vhost_alias

    These modules are not enabled by default, but I find most webservers need them.

    Also on Debian Apache you have to edit charset.conf and uncomment the following line:

    AddDefaultCharset UTF-8

    After that you’re good to go and can just copy over your /etc/apache2/sites-available and /etc/apache2/sites-enabled directories from your rsynced folder and you should be good to go.

    If you use certbot, no problem: just copy /etc/letsencrypt over to your new server (from the rsync dump). This will work. They’re just files.

    But for certbot to run you need to install certbot of course AND finish the migration (change the DNS). Otherwise certbot renewals will fail.

    Entering the point of no return

    Everything so far was prelude. You now have (most of) your data, a working Apache config with PHP, and an empty database server.

    Now the real migration starts.

    When you have prepared everything as described here above, the actual migration (aka the following steps) should take no more than 10 minutes.

    • Stop cron on the old server

    You don’t want cron to start doing things in the middle of a migration.

    • Stop most things — except SSH and MariaDB/MySQL server — on the old server
    • Dump the database on the old server

    The following one-liner dumps all relevant databases to a SINGLE SQL file (I like it that way):

    time echo 'show databases;' | mysql -uroot -pPA$$WORD | grep -v Database| grep -v ^information_schema$ | grep -v ^mysql$ |grep -v ^performance_schema$| xargs mysqldump -uroot -pPA$$WORD --databases > all.sql

    You run this right before the migration. After you have shut down everything on the old server (except the MariaDB server). This will dump all NON MariaDB specific databases (i.e. YOUR databases). The other tables: information_schema, performance_schema and mysql: don’t mess with those. The new installation has created those already for you.

    If you want to try and export and import before migration, the following one-liner drops all databases again (except the default ones) so you can start fresh again. This can be handy. Of course DO NOT RUN THIS ON YOUR OLD SERVER. It will drop all databases. Be very, very careful with this one-liner.

    mysql -uroot -pPA$$WORD -e "show databases" | grep -v Database | grep -v mysql| grep -v information_schema| gawk '{print "drop database " $1 ";select sleep(0.1);"}' | mysql -uroot -pPA$$WORD

    • Run the rsync again

    Rsync everything (including) your freshly dumped all.sql file. This rsync will be way faster, since only the changes since the last rsync will be synced. Next: import the dump in the new server

    mysql -u root -p < /home/whereveryouhaveputhisfile/all.sql

    You now have a working Apache server and a working MariaDB server with all your data.

    Don’t even think about copying raw InnoDB files. You are in for a world of hurt. Dump to SQL and import. It’s the most clean solution.

    • Enable new crontab

    Either by copying the files from the old server or just copy paste the crontab -l contents.

    • Change your DNS records!

    After this: the migration is effectively complete!
    Tail your access_logs to see incoming requests, and check the error log for missing things.

    tail -f /var/log/apache2/*access.log

    tail -f /var/log/apache2/*error.log

    Exim

    I also needed exim4 on my new server. That’s easy enough.

    apt-get install exim4

    cp /home/backup/server.piks.nl/etc/exim4/update-exim4.conf.conf /etc/exim4/update-exim4.conf.conf

    Update: it turned out I had to do a little bit more than this.

  • Use find (1) as a quick and dirty duplicate file finder

    Run the following two commands in bash to get a listing of all duplicate files (from a directory or location). This can help you clean out duplicate files that sometimes accumulate over time.

    The first command uses find to print all files (and specific attributes) from a specific location to a file, prefixing the size of the file in the name. This way all files with the same filename and same size can be grouped together. Which is usually a strong indicator that files are similar.

    When you run the second command you will get a sorted list of all actual duplicates, grouped together. This way, you can quickly pick out similar files and manually choose which ones to keep or delete.

    find . -type f -printf "%s-%f\t %f %c\t %p\n" >> /tmp/findcmd
    
    for i in `sort -n /tmp/findcmd|awk '{print $1}'|uniq -cd|sort -n|awk '{print $2}'`; do grep $i /tmp/findcmd; done

    The output will look something like this, you can instantly tell which files are duplicates, based on size, name and/or timestamp.

    1067761-P4270521.JPG     P4270521.JPG Wed Apr 27 18:05:04.0000000000 2011        ./Backups Laptops/Ri-janne/2011 Diversen
    1067761-P4270521.JPG     P4270521.JPG Wed Apr 27 18:05:04.0000000000 2011        ./Backups Laptops/Ri-janne/2011 camera
    1067898-IMG_3418.JPG     IMG_3418.JPG Thu Aug 28 20:08:28.0000000000 2008        ./Piks/2008/Vakantie USA 2008/Dag 7 Louisville Shopping
    1067898-IMG_3418.JPG     IMG_3418.JPG Thu Aug 28 19:08:28.0000000000 2008        ./Backups Laptops/Ri-janne/2008 USA
    1067969-P9180184.JPG     P9180184.JPG Sat Sep 18 17:45:52.0000000000 2010        ./Backups Laptops/Ri-janne/2010 Diversen
    1067969-P9180184.JPG     P9180184.JPG Sat Sep 18 17:45:52.0000000000 2010        ./Backups Laptops/Ri-janne/2010 uitzoeken
    1068244-100_2962.jpg     100_2962.jpg Thu Jul 17 18:18:52.0000000000 2008        ./.Trash-1000/files/Mijn afbeeldingen/Italia 09/Greece '08
    1068244-100_2962.jpg     100_2962.jpg Thu Jul 17 18:18:52.0000000000 2008        ./Backups Laptops/Jan/Mijn documenten/Mathea/Mijn afbeeldingen/Italia 09/Greece '08
    1068284-DSC_7640.JPG     DSC_7640.JPG Sat Apr 26 14:47:58.0000000000 2014        ./Piks/2014/20140426 KDag
    1068284-DSC_7640.JPG     DSC_7640.JPG Tue Apr 29 21:56:54.0000000000 2014        ./Piks/2014/20140426 Koningsdag
    
  • Save data from your broken Raspberry Pi SD card with GNU ddrescue

    This week my Pi stopped working. After hooking up a monitor I saw kernel errors related to VFS. So the file system was obviously broken. Oops.

    The end conclusion is that the SD card is physically ‘broken’, but I still managed to salvage my data — which is more important than the card. Here’s how.

    Broken file system: fsck or dd?

    What didn’t work for me, but you might want to give a try first are fsck for file system consistency check or using dd to create a disk image.

    I couldn’t check/repair the file system with fsck (it gave errors), not even when setting different superblocks. It might work for you, so you can give this blog a try.

    Next, I tried to ‘clone’ the bits on the file system with dd. To get a usable image. But that didn’t work either, spewing out errors. But this is where I stumbled across ddrescue.

    GNU ddrescue

    I had not heard of ddrescue before but it turned out to be a life datasaver! It does what dd does, but in the process tries “to rescue the good parts first in case of read errors”. There are two versions of this program, I used the GNU version.

    sudo apt-get install gddrescue

    And here is what a sigh of relief looks like, after 43 minutes:

    So the command is:

    ddrescue -f -n /dev/[baddrive] /root/[imagefilename].img /tmp/recovery.log

    The options I used came from this blog:

    • -f Force ddrescue to run even if the destination file already exists (this is required when writing to a disk). It will overwrite.
    • -n Short for’–no-scrape’. This option prevents ddrescue from running through the scraping phase, essentially preventing the utility from spending too much time attempting to recreate heavily damaged areas of a file.

    After you have an image you can mount it and browse your data:

    mount -o loop rescue.img /mnt/rescue

    With this I had access to my data! So I got a new SD card copied my data over and chucked the old SD card. And remember:

  • Linux server principles

    This is a list, in no particular order, of principles to adhere when running a secure Linux server.

    1. SSH – Never allow direct SSH root access (set PermitRootLogin No).
    2. SSH – Do not use SSH keys without a passphrase.
    3. SSH – If possible, do not run SSH on a public IP interface (preferably use a management VLAN).
    4. SSH/SSL – Use strong SSH ciphers and MAC algorithms (Check with https://testssl.sh/).
    5. Never run anything as root (use sudo).
    6. Use deny all, allow only firewall principle. Block everything by default, only open what’s needed.
    7. Configure the mail daemon to use a smarthost (unless it’s a mailserver).
    8. Always use a timeserver daemon to keep server in sync (ntp).
    9. Always use a package manager and apply, at least once a month, updates (apt, yum etc.)
    10. Have backups in place and regularly test the restores.
    11. Do not just backup raw database data. Dump databases and backup those dumps (mysqldump, pg_dump).
  • Just for Fun: The Story of an Accidental Revolutionary

    Just for Fun: The Story of an Accidental Revolutionary

    This book had been sitting on my to-read list for way too long! But I finally found a second hand copy, so here we go!

    You could say this is the official autobiography of Linus Torvalds, the creator of Linux. The Operating System that changed the world! You can wake me up in the middle of the night to talk about operating systems. So this book is right up my alley.

    It’s funny to think that more time has passed since this book came out (16 years), than the time there was between the birth of Linux and the release of the book (10 years). So an update would be welcome, however history = history and this book does a good job of documenting the rise of Linux. Even in 2001 it was clear that Linux was a huge force to be reckoned with and that it would only grow bigger from there. But I think few would suspect Linux would be the most used operating system in the world (largely) because of smartphones i.e. Android. Because people were still talking about the desktop in 2001.

    Celeb life.

    The book is structured around alternating chapters written by Linus himself and the writer David Diamond. It follows a chronological timeline. From young Linus to Linux, to underground celebrity status, to bonafide celebrity, to riches and world domination. The story is told in either conversation form between David and Linus or just plain old retelling facts. Because in 2001 things were relatively ‘fresh’ the book has some nice intricate details. Details that would probably be lost when you write a book about this subject 20 years from now. And that is probably what I liked most about it. I was familiar with most of the history, but this book does a great job of filling in the details to get a complete picture from a first degree account. Also there is quit a bit of room towards the end where Linus shares his thoughts on Intellectual Property, copyright and becoming rich (not Bill Gates rich, but still rich). Which was really interesting!

    Here are some take-aways from the book:

    • Linus is of course a programming genius. He wrote Linus when he was around 21. I would guess only a handful of people in the world were able to do what he did. And he did it at a young age. (He probably wouldn’t like this comparison: but it reminded me a lot of Bill Gates who wrote a BASIC interpreter when he was even younger.)
    • But the genius also manifests itself in the ability to make good design calls (very early on). I would even go so far as to state that his programming ability is surpassed by his talent to make the right choice (design, technical etc.)
    • He has proven this again, by unleashing git (the software versioning tool) to the world in 2005. Which made quite an impact on software development in general (e.g. it gave rise to Github) So not only did he start one of the first software revolutions, he also started the second! With git he doubled down on demonstrating the knack for making the right choices.
    • Even though he famously fell out with professor Tanenbaum, I love that he still states Tanenbaums’ book Operating Systems Design and Implementation as the book that changed his life.
    • He comes from a journalist family who were straight-up communist sympathizers and part of a Finnish minority that speaks Swedish. They also dragged young Linus to Moscow on occasion. And his grandfather was bit of a famous poet in Finland.
    • With this communist background in mind it is funny to think he is very much a pragmatist and not an idealist. But maybe exactly because of this. It’s a very conscious decision and he seems to have thought about it a lot and it permeates everything he does.
    • There is a lot of self-deprecating humor in this book.

      Linus Torvalds and Richard Stallman
    • There are quite a few sexual references. Linus starts the book with stating his view on the meaning of life: using sex as example.
    • The Tanenbaum discussion was about technical choices. The success of Linux sort of gave Linus the upper hand in the discussion. I think this irked Tanenbaum but I also suspect Tanenbaum felt that if he had just released his OS Minix to the world in the same manner Linus had, we probably wouldn’t have had Linux.
    • Stallman gave a talk at Linus’ university about GNU and this led to Linus choosing GPL as the license. And of course gcc was the programming language Linux was written in (developed by Stallman).
    • And this is key, Linus acknowledges this, his project came at the exact right time. A year later and someone else would have probably already done it. Or we would be all be using *BSD (who were still fighting other battles). A year early and no-one would have batted an eye, because too few people online were around to notice.
    • So the timing consist of 3 factors coming together: hence the word timing. The GNU license (invented by Stallman), the availability of cheap 386 processors and the internet. Take away either one and things would be different.
    • Most of all I think that the internet was key, because Linus found his co-creators there and feedback. But also because Linux became the de facto operating system for internet servers and was born around the same time the www was born. This is no coincidence. The internet en Linux grew up together.
    • Also one last point that proves he has good gut feeling, in 2001 he predicted the ubiquity of the smartphone:

    The title of the book is ‘Just for Fun’. And it is written with room for jokes and lighthearted thoughts. But there is also plenty of serious thought on ideals and pragmatism. But fun is the general theme throughout Linus’ life and the development of Linux. The fun that you get from following your curiosity, working hard on making it happen, and caring about what you do. The pragmatic approach of Linus to everything he does seems to create a sense of flow and he follows that flow and has fun with it. This is also backed by how an enormous project like the Linux kernel, which is the biggest software project in the world, is managed. The loose structure that dictates the development comes from flow.

    So all in all it’s a very fun book to read! Even if it’s from 2001 and a lot has happened since. I think there could be an updated version. Or you could ask yourself: “who, in 2017, is the equivalent of 1991 Torvalds?”. So, whose biography will we be reading in 10 years time? My money is on Vitalik Buterin (literally, I own Ethereum). He is a current day one-of-a-kind genius whose technology will probably change the world. Get it?