Tag: mysql

  • Migrating a LAMP VPS

    I recently switched my LAMP virtual server to a different VPS provider.

    The LAMP server that is serving you this site. So the migration worked!

    Here are the steps, for future reference. Mostly for myself, but maybe you — someone who came here from Google — can use this too. This should work on any small to medium sized VPS.

    Let’s go!

    Lower your DNS records TTL value

    When you switch to a new VPS, you will get a new IP address (probably two: IPv4 an IPv6). And you probably have one or more domain names, that point to that IP. Those records will have to be changed for a successful migration.

    You need to prepare your DNS TTL.

    To do this, set your DNS TTL to one minute (60 seconds), so when you make the switch, your DNS change will be propagated swiftly. Don’t change this right before the switch of course, it will have no effect. Change it at least 48 hours in advance of the change.

    Set up a new VPS with the same OS

    Don’t go from Ubuntu to Debian or vice-versa if you don’t want any headaches. Go from Debian 10 to Debian 10. Or CentOS 8 to CentOS 8. Or what have you.

    This blog focusses on Debian.

    Install all your packages: Apache, MySQL, PHP and what else you need.

    My advice is to use the package configs! Do not try to to copy over package settings from the old server, except where it matters, more on that later.

    This starts you fresh.

    PHP

    Just install PHP from package. Maybe if you have specific php.ini settings change those, otherwise you should be good to go. Most Debian packages are fine out of the box for a VPS.

    I needed the following extra packages:

    apt-get install php7.4-gd php7.4-imagick php7.4-mbstring php7.4-xml php7.4-bz2 php7.4-zip php7.4-curl php7.4-mysql php-twig

    MySQL/MariaDB

    apt-get install mariadb-server

    Run this after a fresh MariaDB installation

    /usr/bin/mysql_secure_installation

    Now you have a clean (and somewhat secure) MariaDB server, with no databases (except the default ones).

    On the old server you want to use the following tool to export MySQL/MariaDB user accounts and their privileges. Later we will will export and import all databases. But that is just data. This tool is the preferred way to deal with the export and import of user accounts:

    pt-show-grants

    This generates a bunch of GRANT queries that you can run on the new server. Run this on the new server (or clean them up first if you need to, delete old users etc.). So that after you import the databases, all the database user rights will be correct.

    Set this on the old server, it helps for processing later.

    SET GLOBAL innodb_fast_shutdown=0

    Rsync all the things

    This is probably the most time consuming step, my advice is to do it once to get a full initial backup, and once more right before the change to get the latest changes: which will be way faster. Rsync is the perfect tool for this, because it is smart enough to only sync changes.

    Make sure the new server can connect via SSH (as root) to the old server: my advice is to deploy the SSH keys (you should know how this works, otherwise you have no business reading this post ;)).

    With that in place you can run rsync without password prompts.

    My rsync script looks like this, your files and locations may be different of course.

    Some folders I rsync to where I want them (e.g. /var/log/apache) others I put them in a backup dir for reference and manual copying later (e.g. the complete /etc dir).

    #Sync all necessary files.
    #Homedir skip .ssh directories!
    rsync -havzP --delete --stats --exclude '.ssh' root@139.162.180.162:/home/jan/ /home/jan/
    #root home
    rsync -havzP --delete --stats --exclude '.ssh' root@139.162.180.162:/root/ /root/
    #Critical files
    rsync -havzP --delete --stats root@139.162.180.162:/var/lib/prosody/ /home/backup/server.piks.nl/var/lib/prosody
    rsync -havzP --delete --stats root@139.162.180.162:/var/spool/cron/crontabs /home/backup/server.piks.nl/var/spool/cron/crontabs 
    #I want my webserver logs
    rsync -havzP --delete --stats root@139.162.180.162:/var/log/apache2/ /var/log/apache2/
    #Here are most of your config files. Put them somewhere safe for reference
    rsync -havzP --delete --stats root@139.162.180.162:/etc/ /home/backup/server.piks.nl/etc/
    #Most important folder
    rsync -havzP --delete --stats root@139.162.180.162:/var/www/ /var/www/

    You run this ON the new server and PULL in all relevant data FROM the old server.

    The trick is to put this script NOT in /home/jan or /root or any of the other folders that you rsync because they get be overwritten by rsync.

    Another trick is to NOT copy your .ssh directories. It is bad practice and can really mess things up, since rsync uses SSH to connect. Keep the old and new SSH accounts separated! Use different password and/or SSH keys for the old and the new server.

    Apache

    If you installed from package, Apache should be up and running already.

    Extra modules I had to enable:

    a2enmod rewrite socache_shmcb ssl authz_groupfile vhost_alias

    These modules are not enabled by default, but I find most webservers need them.

    Also on Debian Apache you have to edit charset.conf and uncomment the following line:

    AddDefaultCharset UTF-8

    After that you’re good to go and can just copy over your /etc/apache2/sites-available and /etc/apache2/sites-enabled directories from your rsynced folder and you should be good to go.

    If you use certbot, no problem: just copy /etc/letsencrypt over to your new server (from the rsync dump). This will work. They’re just files.

    But for certbot to run you need to install certbot of course AND finish the migration (change the DNS). Otherwise certbot renewals will fail.

    Entering the point of no return

    Everything so far was prelude. You now have (most of) your data, a working Apache config with PHP, and an empty database server.

    Now the real migration starts.

    When you have prepared everything as described here above, the actual migration (aka the following steps) should take no more than 10 minutes.

    • Stop cron on the old server

    You don’t want cron to start doing things in the middle of a migration.

    • Stop most things — except SSH and MariaDB/MySQL server — on the old server
    • Dump the database on the old server

    The following one-liner dumps all relevant databases to a SINGLE SQL file (I like it that way):

    time echo 'show databases;' | mysql -uroot -pPA$$WORD | grep -v Database| grep -v ^information_schema$ | grep -v ^mysql$ |grep -v ^performance_schema$| xargs mysqldump -uroot -pPA$$WORD --databases > all.sql

    You run this right before the migration. After you have shut down everything on the old server (except the MariaDB server). This will dump all NON MariaDB specific databases (i.e. YOUR databases). The other tables: information_schema, performance_schema and mysql: don’t mess with those. The new installation has created those already for you.

    If you want to try and export and import before migration, the following one-liner drops all databases again (except the default ones) so you can start fresh again. This can be handy. Of course DO NOT RUN THIS ON YOUR OLD SERVER. It will drop all databases. Be very, very careful with this one-liner.

    mysql -uroot -pPA$$WORD -e "show databases" | grep -v Database | grep -v mysql| grep -v information_schema| gawk '{print "drop database " $1 ";select sleep(0.1);"}' | mysql -uroot -pPA$$WORD

    • Run the rsync again

    Rsync everything (including) your freshly dumped all.sql file. This rsync will be way faster, since only the changes since the last rsync will be synced. Next: import the dump in the new server

    mysql -u root -p < /home/whereveryouhaveputhisfile/all.sql

    You now have a working Apache server and a working MariaDB server with all your data.

    Don’t even think about copying raw InnoDB files. You are in for a world of hurt. Dump to SQL and import. It’s the most clean solution.

    • Enable new crontab

    Either by copying the files from the old server or just copy paste the crontab -l contents.

    • Change your DNS records!

    After this: the migration is effectively complete!
    Tail your access_logs to see incoming requests, and check the error log for missing things.

    tail -f /var/log/apache2/*access.log

    tail -f /var/log/apache2/*error.log

    Exim

    I also needed exim4 on my new server. That’s easy enough.

    apt-get install exim4

    cp /home/backup/server.piks.nl/etc/exim4/update-exim4.conf.conf /etc/exim4/update-exim4.conf.conf

    Update: it turned out I had to do a little bit more than this.
  • Cruddiy: table relationship support via foreign keys

    Read here what Cruddiy is and what it can do for you: here is the code.

    TLDR: Cruddiy is no-code Bootstrap 4 PHP form builder for MySQL tables.

    I started Cruddiy when the Covid-19 lockdowns happened this spring, to keep me busy. And I released it on GitHub. After 25 stars 🤩 and 13 forks on GitHub and a couple of really encouraging messages on the original Cruddiy post, I thought it was time for an update.

    🥳 Cruddiy now supports table relationships via foreign keys. 🥳

    This means:

    • You can add new or delete existing table relations by picking columns that have a foreign key relation.
    • You can add specific actions for each table relation, like:
      • ON UPDATE : CASCADE / SET NULL / RESTRICT
      • ON DELETE: CASCADE / SET NULL / RESTRICT
    • Picking specific actions will result in different behavior. Please read up what these mean (mostly you want ON UPDATE CASCADE and ON DELETE CASCADE).

    Having table relations in place wil have the following results for Cruddiy:

    • On the Create form the field will be populated with the correct key information.
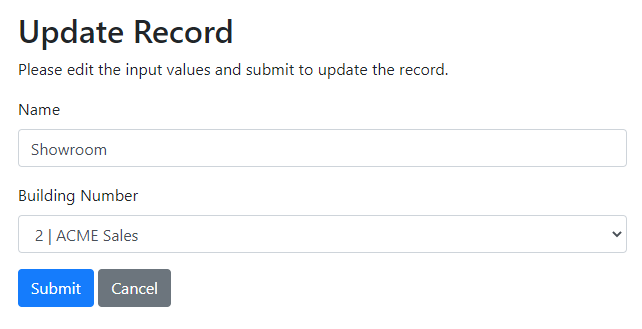
    • On the Update form: the correct stored value will be preselected but you can still choose (update) different values from the select list.

    Note 1: the table relationship builder is the first step in the Cruddiy CRUD creation process. However it is completely safe to ignore this step and move to the next step! I would even strongly advise doing so if you are not sure what you need to do, because it might break things. Also if you just want one or a couple of simple unrelated forms it is perfectly safe to skip this step.

    Note 2: the table relationship builder is of course just a GUI for something you can also do in PHPMyAdmin or MySQL from the commandline. However, Cruddiy makes it visible and easier to work with table relations.

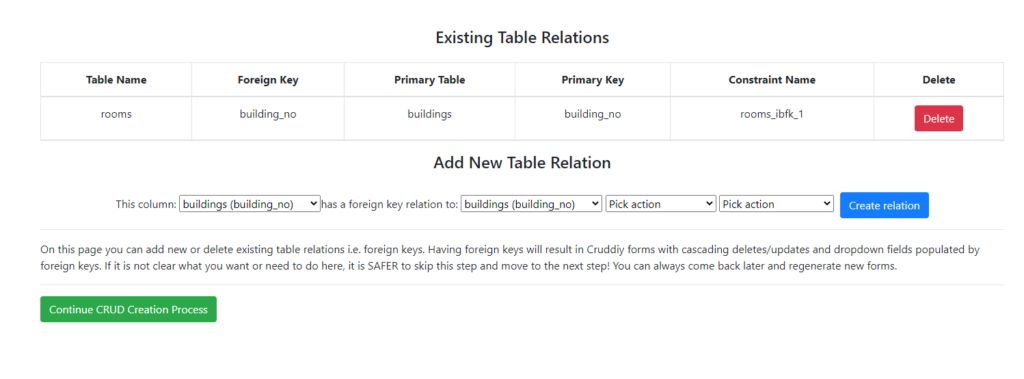
    Some screenshots:

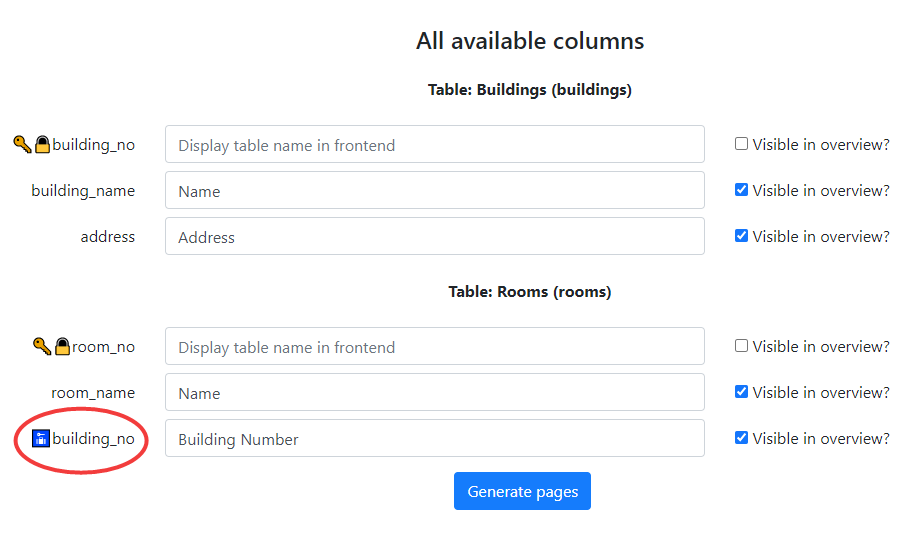
    Table relation builder. One existing relation. And a couple of dropdown lists to create new ones. Feel free to skip this step by hitting ‘Continue CRUD Creation Process’.
    In the column form columns with foreign keys are indicated by the blue icon.
    A simple two field table. As you can see the second item is preselected (as it should be). However it is still possible to select a different value.
  • Foster: how to build your own bookshelf management web application


    foster
    /ˈfɒstə/

    verb

    1. Encourage the development of (something, especially something desirable). “the teacher’s task is to foster learning”

    TLDR: I made a personal bookshelf management web application and named it Foster and you can find it here. Here’s what I did — with gifs–, so you might build your own.

    Name

    I named it Foster. Because of *this* blog post — it accompanies the application, so it’s self-referential. And also, because I am currently reading David Foster Wallace‘s magnum opus Infinite Jest. And lastly, the word ‘foster’ makes a lot of sense otherwise, just read on 😉

    Background

    I like to read and I like to buy physical books — and keep them. Over the years I tracked both of these things in a spreadsheet. But this became unmanageable so I needed something else.

    Something like Goodreads but self-hosted. So, preferably a web application where I could:

    • track my reading progress
    • keep track of my bookshelf

    But I couldn’t find anything that fit, so I knew I probably had to roll my own. In simpler times MS Access could do this sort of thing in a heartbeat. But it’s 2019 and I wanted a web application. However I am not a web developer and certainly not a frontend developer.

    But when I came across https://books.hansdezwart.nl/ I knew this was what I was looking for! So I emailed Hans. He was very kind in explaining his application was self-coded and not open-source, but he did provide some pointers. Thanks Hans! So with those tips I built my own application (front and back) from scratch. And I decided to pass the knowledge on, with this blog.

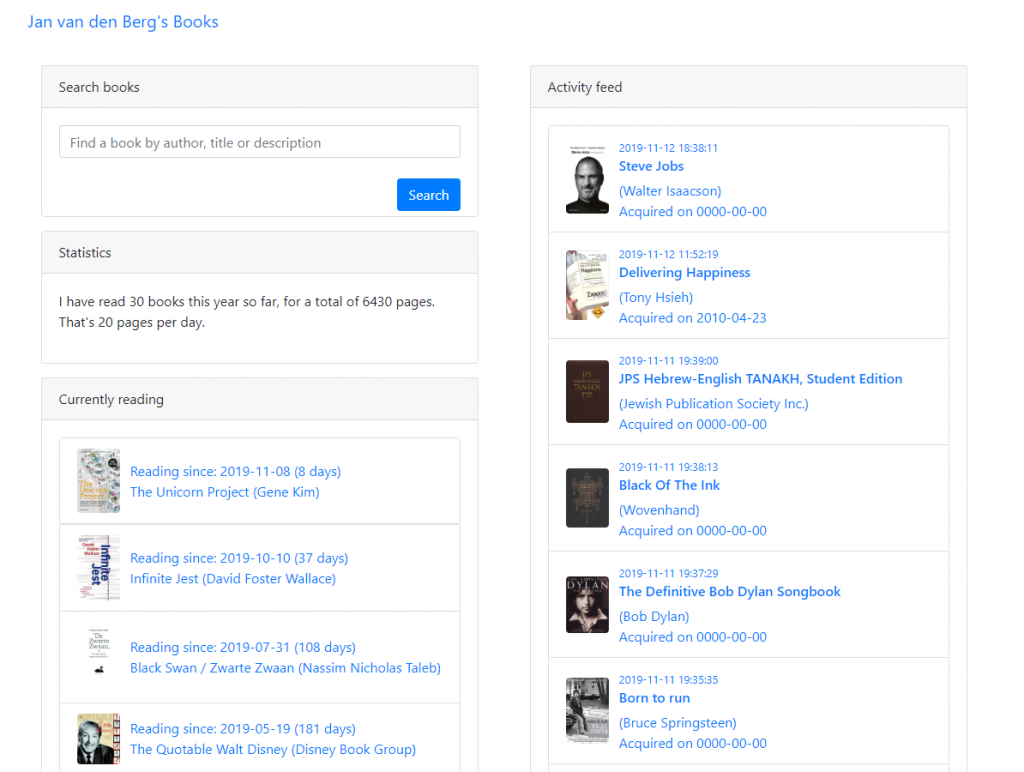
    The Foster fronted (I am still adding books)

    This is what the Foster frontend looks like. It’s pretty self-explanatory: I can search *my* books, track and see reading progress, track collections, click through to book details and see the activity feed (more on that later). Oh, and it’s fast! ♥

    Frontend

    The five different parts in the frontend are: ‘Search’, ‘Statistics’, ‘Currently reading’, ‘Collections’ and ‘Activity feed’. They are presented as Bootstrap cards. The frontend is just one index.php file with a layout of the cards. All cards (except ‘Search’) are dynamically filled with content expressed as a div class. The class content is generated by one JavaScript function per card, which in turn call a PHP file. And the PHP files just echo raw HTML.

    Other than the index.php file there is one search.php file to make up the frontend. This file takes care of presenting the book details, search output, log and lists views (more on that later). So, most of what can be done and seen in the frontend is handled by the search.php file.

    The frontend itself is of course nothing unique. It’s just a representation of the data. The backend is a bit more interesting!

    Database

    The frontend was the easy part. At least it was after I figured out the backend! I spent quite a bit of time thinking about the database design and what the backend would have to do. I thought the design for such a small application wouldn’t be too difficult. But I surprised myself with the number of changes I made to the design, to get it just right. And I wanted to get it right because:

    General rule of thumb: when you start with a good design, everything else that comes after will be a lot easier.

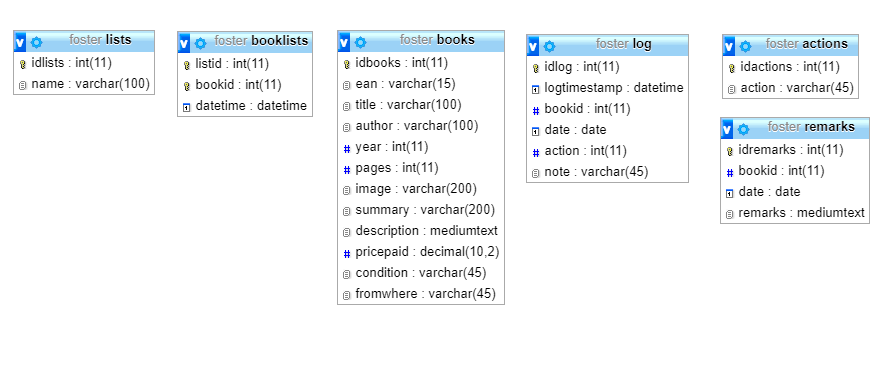
    chrome_2019-11-11_15-19-42.png (885×385)
    Self-explanatory view of the database design

    The multiple foreign-key relations between tables (on ids etc.) are not defined in the database. I choose to do this in the code and the JOIN queries.

    It’s not hard to understand the database design. And yes, the design could be a little tighter — two or three tables — but let me explain!

    Log, actions and states

    One of the main things I spent time thinking about are the actions and their respective states.

    I figured you can do one of five things with a book (actions):

    • You want a book
    • You get/buy/own the book
    • You start reading it
    • You finish reading it
    • You purge/remove/sell/give away the book

    Makes sense right? You could even call it the ‘book life cycle proces‘. With one input and one output.

    HOWEVER! Some books you already own without wanting them first. Or, you can read the same book more than once. Or, you can give a book to a friend, and buy it again for yourself. Or, you can finish reading a book, that you lent — from a friend or library — so it is not on your shelf anymore. All of these things happen. So actually the ‘life cycle’ actions are not a chronological fixed start-to-end tollgate process, it’s continuous and messy.

    Book log

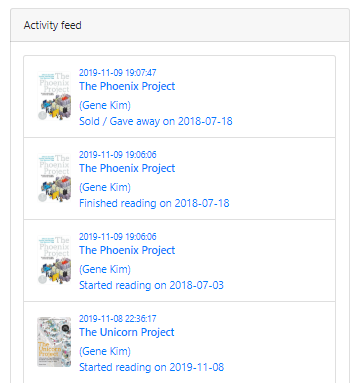
    Every new action is added to the book log. In the frontend the last 25 entries to the book log are presented as the Activity feed. Every action has a timestamp when an action got logged and a date for that action. Which are two different things. So when I now add a book to my shelf that I acquired 4 years ago, the book log timestamp is now, but the date for the action is 4 years ago.

    The Activity feed

    With this log I can keep track of books even after I got rid of them (because selling/purging is just one of the action for a book). This is important because this way I don’t lose the log history of a book.

    Also I can add books to my wanted list even if I have owned them before (maybe I gave them away etc.). And I can start/finish reading the same book more than once. It doesn’t matter, because it is just a log entry.

    Now here’s the interesting thing. With all this log information I can generate four states:

    • Books I want
    • Books I own
    • Books I have read
    • Books I had

    These states are generated by specific hardcoded queries per state. They are generated on the fly by what is in the log file, and where the most recent log records prevail to decide the current status.

    And with all this:

    Foster will track the complete history per book and at all times represent all books I want, own, have read or have owned, at that specific moment in time.

    Lists

    I could have defined these actions as a list: but lists are simpler. Let me explain.

    I tend to collect and read specific genres of books, e.g. music, management and computer history books. So I tend to organize books like that. These descriptions/genres are all, of course, just lists.

    Some books can be three of these things at the same time: part biography, part computer history part management. So one book can be a member of more than one list.

    In the Foster backend I can add or delete books to and from as many lists as I like.

    Easily adding/deleting books from a list with the same dropdown menu (click for a gif)

    I can also easily create new lists. Say: a list of books that I want for my birthday, or books that are on loan, or books that are signed by the author etc. I just add one new list to my table, and the list will be instantly available in the backend and presented in the frontend.

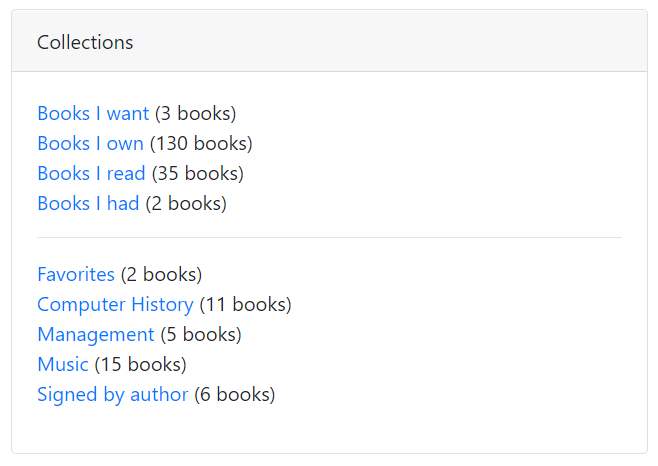
    Collections

    In the frontend the action log states and the different lists are grouped together under the Collections card. As stated the first 4 collections are populated from the log, and a book always has a last state. The others are just lists.

    I can create or delete as many lists as I’d like, and it won’t affect the book log. This way I can organize my book collection far better than I could physically (a book can only have one spot on your physical shelf).

    Adding books with the Bol.com API

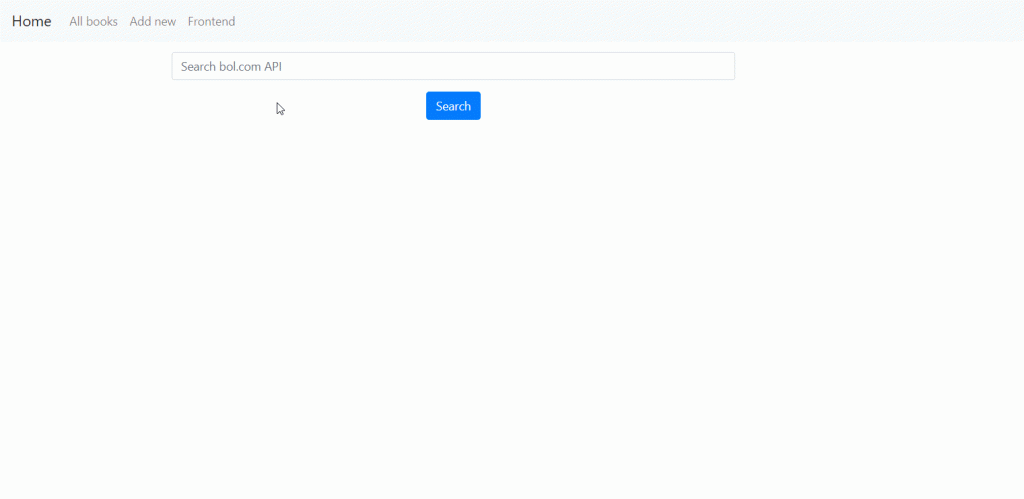
    This is where the magic happens! Bol.com — a large Dutch book retailer — has a very easy API you can use to query their book database. I use it to search and add books to my collection. With one click I can get most book details: title, ISBN (=EAN), image, description etc. And I can pull them all into my own database. Including the image, which I then copy and store locally. Like this:

    Adding a book via bol.com API (click for a gif)

    Of course I can also edit book details when necessary, or just enter a book by hand without the API. Sometimes Bol.com does not carry a book.

    Backend

    The bol.com search API is the start page of my backend. The other important backend page is an overview of all my books. Clicking on the titles brings up an edit view of a book. But most importantly I can quickly add or delete books from lists here AND add actions (started reading, finished).

    I have defined jQuery actions on the <select option> dropdown menus, which provide a popup — where I can fill in a date if necessary — and which trigger database inserts (there definitely might be some security concerns here: but the backend is not public).

    Security

    The frontend is open for everyone to see. I don’t mind sharing (my podcast list is also public), also because I always enjoy reading other peoples lists or recommendations. The backend is just one .htaccess password protected directory. In my first database design I had a user table with accounts/passwords etc. But the .htaccess file seemed like the easiest/quicker solution for now.

    Tech

    I built Foster from scratch, no Symphony/Laravel or what have you. And I am a bit annoyed surprised there is still no MS Access RAD equivalent for the web in 2019 (i.e. a all in one tool: from DB design to logic to GUI design to runtime).

    I know Django does most of the backend for you , so I briefly looked at it. But for Foster I still ended up using PHP / MariaDB / Bootstrap 4 / JavaScript / jQuery. It’s a familiar and very portable stack that you can mostly just drop and run anywhere (and most answers are on StackOverflow 🤓).

    I’ve thought about using SQLite, but I am very familiar with MySQL/MariaDB so that made more sense. Also I learned more about Bootstrap than I actually cared about, but that’s alright. And I wrote my first serious piece of JavaScript code ever (for the dropdown select actions). So that was fun.

    All in all: I spent a few days pondering the database design in the back of my mind. And 4 evenings programming front and backend. And now I am just polishing little things: which is a lot of fun!

    Further development

    Right now, I still have around 200 more books from my library to catalogue correctly — that’s why some dates are set to 0000-00-00. But here are a few possible new features I am thinking about:

    • RSS feed for the activity log? Now that I am bulk adding books the activity feed is not so relevant, but when things settle down, who knows, people might be interested. After I wrote a draft of this blog I implemented it!
    • Twitter integration? Posting the log to a dedicated Twitter feed.
    • Adding books by scanning the barcode / ISBN with your phone camera? If I can just get the ISBN I can automate bol.com API to do the rest. Might speed things up a bit (and might be useful when you run a secondhand bookstore 😉). I created an iOS shortcut that does exactly this! It scans the book barcode/ISBN/EAN and opens the Foster edit.php URL with this ISBN number and from there I can add the book by clicking ‘Add’ (all book details are available and prefilled by the Bol.com API). It’s great!
    • Storing/tracking more than books? CDs, DVDs, podcasts I listened too, movies I watched etc.
    • Multi-user? In the first database design there were multiple users that could access / add the books that were already in the database but still create their own log and lists. I think I could still add this to the current design.
    • As you can see in the database design, there is a remarks table. I haven’t used this table. A remark is a ‘blog’ (or a short self-written review) of a book, that can be presented with the book details. This is a one-to-many relationship, because you might want to make new remarks each time you reread a book. But, I currently blog about every book I read, so the remarks might be just an embedded blog link?

    Just share the source already!

    “Foster looks nice. Please share the code!” No, sorry, for several reasons.

    1. I made Foster specifically for me. So chances that it will fit your needs are slim and you would probably still need to make changes. In this post I share my reasoning, but you should definitely try to build your own thing!
    2. When Foster was almost done, I learned about prepared statements (did I mention I am not a web developer?)… so I had to redo the frontend. But I haven’t redone the backend (yet): so it’s not safe from SQL injections or other pretty bad coding standards. Open sourcing it can of course generate code improvements, but it would first make my site vulnerable.
    3. But most importantly: Building a web application to scratch your own personal itch and learning new things can be one of the most fun and rewarding experiences you will have! And I hope this blog is useful to you, in achieving that goal.
  • About WordPress, emojis, MySQL and latin1, utf8 and utf8mb4 character sets

    PSA: the MySQL utf8 character set is not real Unicode utf8. Instead use utf8mb4.

    So you landed here because some parts of your website are garbled. And this happened after a server or website migration. You exported your database and imported this export or dump on the new server. And now your posts look like this:

    Strange characters!

    When they should look like this:

    Emojis!

    These are screenshots from this website. This website was an old WordPress installation that still used the latin1 character set. The WordPress installation was up to date, but automatic WordPress updates will never update or change the database character set. So this will always remain what it was on initial installation (which was latin1 in my case).

    And latin1 can not store (real) Unicode characters e.g. emojis. You need a Unicode character set. So, just use utf8, right?

    Problem 1: exporting and importing the database with the wrong character set

    When exporting/dumping a database with mysqldump, this will use the default MySQL servers’ character set (set in my.cnf). In my case this was set to utf8. But by not explicitly telling the mysqldump to use the correct character set for a particular database (which was latin1) my dumped data was messed up.

    So when I restored the dump (on the new server) some text was garbled and emojis had completely disappeared from blog posts.

    I fixed this with help of these links. Key here is: explicitly set the correct character for a database when exporting this database. Then: change all instances in the dump file from the old character set to the new character set and import this file.

    https://theblogpress.com/blog/seeing-weird-characters-on-blog-how-to-fix-wordpress-character-encoding-latin1-to-utf8/

    Problem 2: some emojis work, some don’t

    After this my text was fine. I exported using the old character set and imported using utf8, what could go wrong! But some emojis were still missing, but others were not?! This was a head-scratcher.

    There is a question mark instead of an emoji

    How can this be, I had set my database character set to utf8 (with utf8_general_ci collation). This is Unicode, right? Wrong!

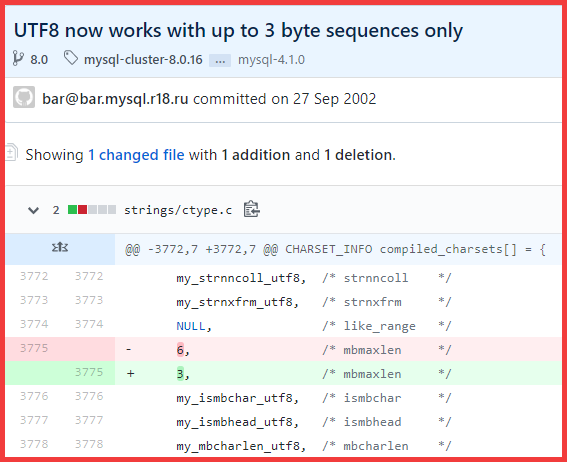
    MySQL utf8 does not support complete Unicode. MySQL utf8 uses only 3 bytes per character.

    Full Unicode support needs 4 bytes per character. So your MySQL installation needs to use the utf8mb4 character set (and utf8mb4_unicode_ci collation) to have real and full Unicode support.

    Some strange decisions were made in the 2002. 🤯 Which has given a lot of people headaches.

    So, MySQL utf8 only uses three bytes per character, but the explanation for the image with the one missing emoji is, that *some* emojis (like the❤️) will be expressed correctly with only three bytes.

    Problem 3: but I used emojis before, in my latin1 WordPress installation?!

    Yes, things worked fine, right? And here is the thing: if you dumped your database with the correct (old) character set and imported correctly with this old character set, things would still work!

    But you said latin1 does not support (4 byte character) emojis!?

    Correct!

    However WordPress is smart enough to figure this out: when using emojis in post titles or posts it will check the database character set and change the emoji to (hexadecimal) HTML code — which can be expressed and stored just fine in latin1.

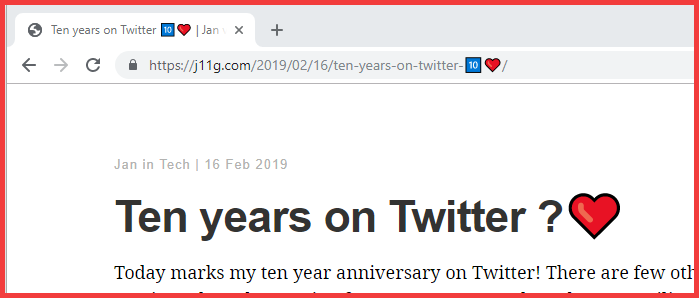
    But how do you explain this image? This was after incorrectly dumping and importing a database.

    Wait, what?! The URL has the correct emoji but the post title does not!?!

    The post URL has two emojis, but one emoji is missing from the title?! I already explained why the emoji is missing from the post title, so how can that emoji be present in the post URL? This is because WordPress stores the post titles differently from the URLs.

    How the title and the post name (url) are stored

    So the post title field stores real Unicode symbols and the post_name (URL) field stores them encoded. So there you have it 🤓!

  • Django in 10 minutes

    Django in 10 minutes

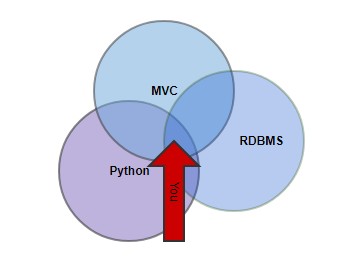
    This post is for myself, two weeks ago. I needed something like this. Or, maybe it’s for you? You know a little bit of Python, kind of understand the MVC concept and have a clear understanding of RDBMS? Congratulations, you will have no trouble getting something up and running in Django in a couple of minutes.

    Whether you need to move a database to an editable, shareable environment for less tech savvy people (phpMyAdmin), or move some spreadsheets to a database and want a quick CRUD setup? Django, a Python based web framework, can help. Follow these steps (yes, Django docs are great, but elaborate).

    Step 0 Database design

    The most important step. Forget about the rest if you don’t have this in order. Design a good database. Think about your keys and relations. You can use MySQL Workbench or edit Python code  (more on that later) to create a database. If you get this step right: Django takes care of the rest!

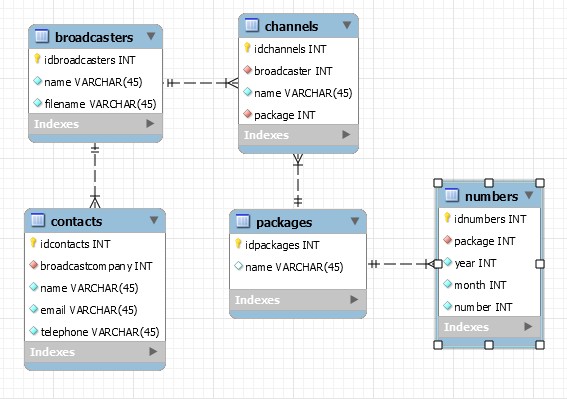
    Here is a small database setup I used. Made with MySQL workbench.

    MySQL workbench design

    So I created this, exported it and and imported it into a MySQL database. But you can have a different approach. As long as you think about your database design.

    Step 1 Setup your environment

    Normally this would be the first step. But since database design is vital I made that the first step. So, I assume you have a Python environment, therefore you are gonna use virtualenv. You don’t need-need it, but it creates an environment where you can’t break too much. Python uses pip to install packages. Django itself is a such a Python package, but most of the time you don’t want random development packages cluttering your main system. You want to keep all of that in your virtual environment. Virtual is a big word: it is just a dedicated directory.

    mkdir venv (or any name)
    virtualenv venv -p /usr/bin/python3.4 (or whatever your Python location is)
    source venv/bin/activate (activate the virtual environment)
    

    Bam! You are now *in* your virtual environment: noted by the prompt (venv). If you now invoke pip it installs packages only in that virtual environment. Want to leave the virtual environment? Type: deactivate.

    Step 2 Create your Django project and app

    Next, you need Django. You can install it system-wide or only within your virtual environment. Either way, just use pip:

    pip3 install Django
    pip3 install mysqlclient

    Now you have Django (and you have installed the mysqlclient with it). Depending on your system you may also need to install libmysqlclient-dev (apt-get install libmysqlclient-dev on Debian) for the mysqlclient to install correctly.

    Next: create a Django project. A Django project is a collection (a folder!) of apps. And apps are also folders. They all sit in the same root folder, together with the manage.py file. This next command creates a folder and within that folder another folder with the same name and it creates the manage.py file. This is your project.

    django-admin startproject my_fancy_project

    Next: create an app. Projects don’t do much by themselves: apart from some settings. So in the project directory where the manage.py file is, you type:

    python3 manage.py startapp my_awesome_app

    A folder will be created next to your project folder. This is your app folder and where most of the work will be done. You can create as many apps as you like. Some projects are one app, some are multiple. Apps share the project settings.

    Step 3 Create your models

    Django comes with batteries included. Meaning, by default it has a db.sqlite3 file as a database. This database stores users and sessions and all that. However I want to use MySQL.

    On to the magic!

    So my database (step 0) is in MySQL.

    In your project settings.py file point your project to this database:

    DATABASES = {
        'default': {
            'ENGINE': 'django.db.backends.mysql',
            'NAME': 'iptv',
            'USER': 'iptv',
            'PASSWORD': 'my_awesome_password',
            'HOST': '127.0.0.1',
            'PORT': '3306',
        }
    }

    Now we want to tell Django to look at our database and DO THE WORK. Use the inspectdb command to INSPECT your database and AUTOCREATE a models.py file.

    python3 manage.py inspectdb my_awesome_app/models.py

    The models.py file is your most important file. It holds the logic for your app. This is a file with essentially Python code that describes your database (every table as a class). You can also code it by hand, but inspectdb is very handy!
    Here is what my class/table/model called Package looks like in the models.py file. This is autogenerated by inspectdb. I added the __str__(self) function by hand (so you see the right name in Django). And notice how it links to your db_table ‘packages’.

    class Package(models.Model):
        idpackages = models.AutoField(primary_key=True)
        name = models.CharField(max_length=45, blank=True, default="", null=False)
    
        def __str__(self):
            return self.name
    
        class Meta:
            managed = False
            db_table = 'packages'

    Congratulations! You now have code that understands and can talk to your database!

    Step 4 Profit!

    You’re done. What do you mean? Well, this is where Django shines. It comes with a very capable Administrator interface, user management, logging and more. Django is designed to quickly get something up and running so people can start filling the database while you create a frontend (view). However for intended purposes, maybe you don’t need a frontend. Maybe the Administrator backend interface will do just fine.

    Okay, there are still a few steps. But you came this far, so the next steps are easy.

    Of course you need a user: create one. This will only work after you’ve done makemigrations and migrate (see below).

    python manage.py createsuperuser --username=jan --email=jan@j11-awesomeness.com

    This will create a Django user so you can log in to the admin backend. But wait, nothing is running yet. You can use whatever webserver you like, but batteries included, you can just start up a Python webserver:

    python manage.py runserver 0:8000
    
    (venv)[11:08:59]jan@server:~/projects/my_fancy_project$ python manage.py runserver 0:8000
    Performing system checks...
    
    System check identified no issues (0 silenced).
    November 22, 2017 - 10:09:02
    Django version 1.11.7, using settings 'project.settings'
    Starting development server at http://0:8000/
    Quit the server with CONTROL-C.

    This starts a webserver on port 8000 (choose whatever port you like). You can now browse to http://[youripaddress]:8000/admin and you will be presented with a login screen.

    Note that whenever you make changes to your database structure (don’t do this too often, start with a good design). Run the following:

    python manage.py makemigrations
    python manage.py migrate

    This will make a migration schedule for you, and migrate things. But you also need to use these commands to initially migrate from the built-in default database (db.sqlite3) to MySQL: after you defined the settings.py file (step 4).

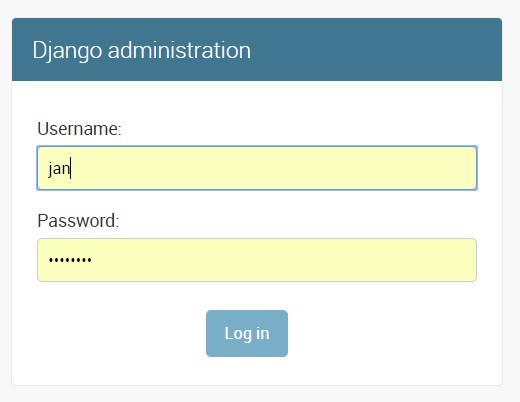
    So, I have a user, I migrated my Django project to MySQL, I have my models.py file and I have a webserver running. So, I get a login screen like this on http://[youripaddress]:8000/admin

    Django administration login screen

    So I logged in. But where is my app? Where are my models/tables, so I can edit them? Well they are there, just not visible in the admin interface just yet. In the settings.py project file add your app to INSTALLED_APPS. And you’re done. You now have a complete CRUD environment where you can create and edit users and groups (Django default) and tables from your app (oh yeah!). It looks like this.

    Django administration interface

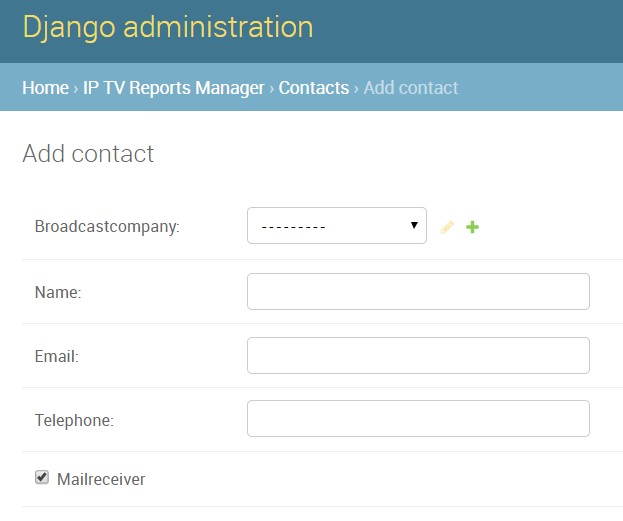
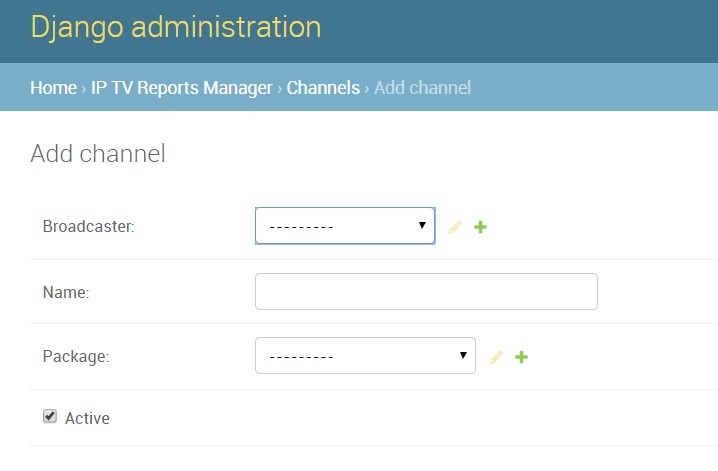
    When you click the tables (models!): you can see  automatic dropdown lists with database relations and checkboxes and all that. This is all generated from the models.py file.


    Django contacts exampleDjango channels example
    What’s next?

    As said, this is a quick way to get your data in de Django admin interface and start adding data, while you work on the frontend (views). I am not doing that, the admin is good enough for me. So, remember: apps are folders, the models.py file is important, most things are done with manage.py.

    Django is really popular and there are lots of tools/libraries you can use/hook into your own Django app. Just use pip. For example I use django-sql-explorer which is a full frontend to create, store and export SQL queries.

    Conclusion

    I like Django because from all the things I tried (things: easy web CRUD) this made the most sense. I also like the start-with-your-database-design approach (very reminiscent of MS Access, which I love). However, I still think it maybe is too much work. Sure, if you have done it before, know virtual environments, know manage.py, know a bit of Python,  this all really can be done in 5 minutes. Really. However, if you haven’t, maybe this could all be a bit overwhelming, so hopefully this blog helps! Or maybe there are even easier tools to get something up and running quickly?